Saturday, May 28, 2011

CHAPTER 5 – Spring, 1981 . . . . . . . . . . . . . . . . Regrouping, and planning for the summer

For seven months I had worked toward the singular goal of constructing a strong foundation for our home. With that foundation finally planted in January, I experienced the euphoria of a major accomplishment.

More importantly, I experienced a huge feeling of relief that I could slow down, regroup – and simply think things through.

As the concrete cured in January and February, I was into the project to the tune of $9129.43, about a third of which was the cost of the land. In addition to a big 'ol block of concrete, I also had a caved-in septic tank to repair and a number of other projects to tackle before the summer-1981 push to frame the house.


The first order of business following the concrete-
truck mishap was to fashion a new concrete lid
for the septic tank. Fortunately, the tank had
never been used – it was clean and dry.

Above: I designed a temporary support system
of small pieces of wood that could easily be
removed through a hatch – once the new concrete
lid had cured.

Not the least of these spring projects was the successful completion of my second year of teaching journalism at Travis High School. Spring was the frantic season of completing the yearbook and competing in scholastic contests, along with publishing the monthly student newspaper . . .


. . . Oh, and I had one more spring project! Our child was on the way – I was to become a father in June.

This is a photo of Anne and my Mom, Lee, in a field of Texas bluebonnets about three months before Anne gave birth to Chris.

As corny as it sounds, we were building a home for our new 1981 family.


All of the wood for this project was recycled from the slab foundation forms. These planks are supported by the posts shown in the first photo.  The box-like structure forms the "hatch." These square forms were designed to create a portal through the concrete that would allow me to crawl down into the tank and remove all the supporting wood – once the concrete had cured.

In addition to providing access to haul all this wood out of the tank, the hatch would also allow for future septic pumping/cleanout when necessary.


A wider view of the septic-tank forms with square "hatch."

I placed plastic sheeting over the wood forms prior to installing rebar.  This would make it easier for me to remove the forms from below once the concrete had cured.  The sloped indentation in the center was designed to provide extra support to the back-side wall of the tank, which was slightly bowed by the cement-mixer truck that caved into it in January. 

On the left side: At the last minute, I came up with a brilliant idea.: install plumbing for a temporary toilet to be used during construction.   I would need to build a tool shed, anyway, so why not build the temporary shed directly over this tank and put a potty on it?

My Dad helped me mix the concrete.  In the foreground you can barely see the top of the square wooden "hatch" that would provide a portal to beneath.
This is the flange and water-supply pipe for the temporary tool-shed toilet.
Anne checks out the work on the new septic-tank lid.

Recycling wood like crazy: I built the toolshed using some of the same boards that began their journey on the walls of Perry Rose Firestone in Downtown Austin – sometime the mid-20th Century.  When they tore down that tire dealership in 1980, I bought a load of scrap wood and hauled it to the lot.  My friend Dave Mosteller came out one afternoon and helped me pull all the nails out of the planks.

These boards went from the walls of the tire dealership to become the formwork on this slab foundation. Then I recycled them again for the septic forms; and finally, for this toolshed.
The toolshed with some paint.  In the foreground, scrap-lumber fire.

This was the first delivery of "sandy loam," a soil that comes from dredging the Colorado River bottoms east of Austin.   In future years, such deliverys of dirt were sometimes big events for my son, Chris, his cousins Zach and Adam, and neighborhood kids.  They would spend endless hours sculpting the mound with toy trucks, building tunnels, and generally amusing themselves in those early 1980s days of no electronic gadgets, no Internet.  Just good, clean dirt!

Later in the 1980s, fire ants decided that they just loved building their beds in this sandy loam.
The hatch.  I crawled down into the tank and removed all the supporting formwork for the septic-tank lid through this portal.
A view of the toolshed/potty with an authoritative no-trespass sign.  Part of my Texas birthright! Actually, the sign was meant to deter some of the neighborhood kids from vandalizing things. Shortly after I poured the slab, some kids spray painted graffitti onto the side of it.

Though the photo is a bit fuzzy, I believe this is my brother Billy, who came out to survey the operations while on a break from Stephen F. Austin State. He wanted to see exactly what he was getting into. In a few months he would partner up with me on our 2-man framing crew.

Sneak Preview:  Below, ten years later.   Chris, flanked by cousins Adam and Zach, helped me build these backdoor steps in August 1991.  Having lived in California since 1988, the long-distance hassles of trying to manage this property became too much. We finally came to the conclusion that it was best to sell the house and buy into the California real estate market.

Zach and Adam lived in Urbana, Illinois, but were in Austin for a summer visit.  To reward them for their hard work on the steps, I took them to breakfast at Jims on Highway 71 in Oak Hill.   Mmmmm.
Above:  Adam, Chris, and Zach, who finally graduated from "Transformers" to real tools!

Below: The news steps, and lovely live oak trees, in 1991.


TO BE CONTINUED . . . . . . . . . . . . . . . . . . . . . . .
Chapter 6:  "The Quarrymen"

Saturday, April 16, 2011

CHAPTER 4 – Jan. 16, 1981 . . . . . . . . . . . . . . . . Pouring the concrete slab

The foundation forms . . . ready for concrete.
For a number of years after this cold, January date, Anne and I celebrated our "Slabiversary." It was a long, hard day of work. A day of near-disasters. But also a day of success.

Five cement trucks from Centex Materials – carrying a total of 44 cubic yards of concrete – made their way to the job site. That was $1663.20 worth of concrete.

Almost from the start, the day took an ominous turn:  A cement truck sank into the septic tank.  One of the forms on the highest corner of the foundation began bulging out with concrete because I had forgotten to drive a couple of nails. 

But meltdowns were averted and it all worked out.

Thirty years later, some members of the volunteer brigade still carry scars. Cement burns, for example. There were five of us in the work crew: Dominic (my Dad), Jimmy & Glen Long, Dave Mosteller, and myself. Joining us later in the day to bear witness and provide good cheer were other family members.

I tried to plan for everything – I even rented a gasoline-powered trowling machine, not realizing that a person actually needs a lot of experience using such a machine. I had watched laborers use such a machine and they made it look easy!


Glen and Jimmy Long were among the first to arrive. It was a cold morning so we built a fire out of scrap wood. Glen warms himself by the fire (left), while Jimmy prepares to don rubber boots.


Below: A brief video of slab-pouring day. The original Super 8 home movie was filmed by Mary Yemma Long (my sister). I constructed this narrated version in May 2011.  Yes, there is footage of the cement truck collapsed into the septic tank!

Forty-four cubic yards of curing concrete.

Chapter 6 sneak preview:  The Quarrymen
Rocking to a 90-lb. jackhammer, Paul Yemma and Mark Sims help dig the "pig hole."


TO BE CONTINUED . . . . . . . . . . . . . . . . . . . . . . . . . . . .
Chapter 5:  Repairing the septic tank that the cement truck crashed into.


Thursday, April 7, 2011

CHAPTER 3 – December 1980 . . . . . . . . . . . . . . . . Getting by with a little help from my friends

Actually, help from my family.

With the Christmas holiday season approaching, I was blessed with a ready-made pool of volunteer labor as several of my brothers returned to Austin. Amid the beer, bonfires, barbecue and bottle-rockets, rapid progress was made on the house foundation.

Billy was on semester break from Stephen F. Austin State University.  Andy came down from Des Moines, Iowa, and loaded up with firecrackers and bottlerockets for the holiday.  Paul was on break from Austin Community College. And Jimmy Long, a brother-in-law who is a brother, took time out of his busy schedule working on a PhD at the University of Texas to help shape the dirt.


Now that the big dirt pile was gone, I could get clear lines of sight from corner to corner. With my Dad's help, we patiently squared off the lines so that we had a rectangle rather than a parallelogram. We managed to get the diagonal lines to measure within 3/16 of an inch – almost perfect.  It is important to start out as perfect as possible with the geometry at the base because any errors are compounded as the house framing goes up. By the time you get to the roof, any major error on this geometric dirt pile would mean rafter angles that don't match up.
Once the rectangular lines were up and leveled (we rented a builder's transit), we could start building the outer forms. These old boards came from the demolished Perry Rose Firestone in downtown Austin.
 

Rebar in the internal footings. With Jimmy's advice, I used #5 (5/8") steel along the bottoms of the footings and #4 (1/2") along the tops.  The steel is tied into the 4 piers that go down to the undisturbed limestone.


Along the front edge of the future house, I inserted large bolts through the forms – to be used to attach a wooden deck to the concrete.
 

Detail of the internal-footing reinforcement tied into one of the piers near the downstairs bathroom.

Billy and I dug out this footing at the back of the house. The white pipe is the main sewer drain that runs out to the septic system – repaired after a backhoe mishap.

Below: Forming around the front-porch inset. This part was a hassle.

Front corner. At left, some of the bolts that a wooden deck will attach to.
New Year's Eve: During the day we made a party of the work. Billy, Tracy, Andy and I came out early and grilled hamburgers over an open fire. While 3 of us bagged dirt, Andy shot bottlerockets at us and "tended" the hamburger fire and cooler of Pabst Blue Ribbon.

Later, Anne, Mary, Jimmy, Zach, Paul, Dave Mosteller, Mama and Daddy all came out to join the festivities. After pigging out on burgers and drinking a few dozen beers, Billy put everyone back to work filling sandbags. That included Zach, who wasn't quite 2 – but it excluded Andy, who was still shooting bottlerockets.

Together, we filled about 150 bags – about 15,000 pounds worth of dirt and sand.  In the evening, we all went back to Havenside and Mama fed us.   (I didn't record in my journal what she fed us, but I'd bet good money it was spaghetti and meatballs.)


Billy working on the back footing – and the job-site Chevy Vega.
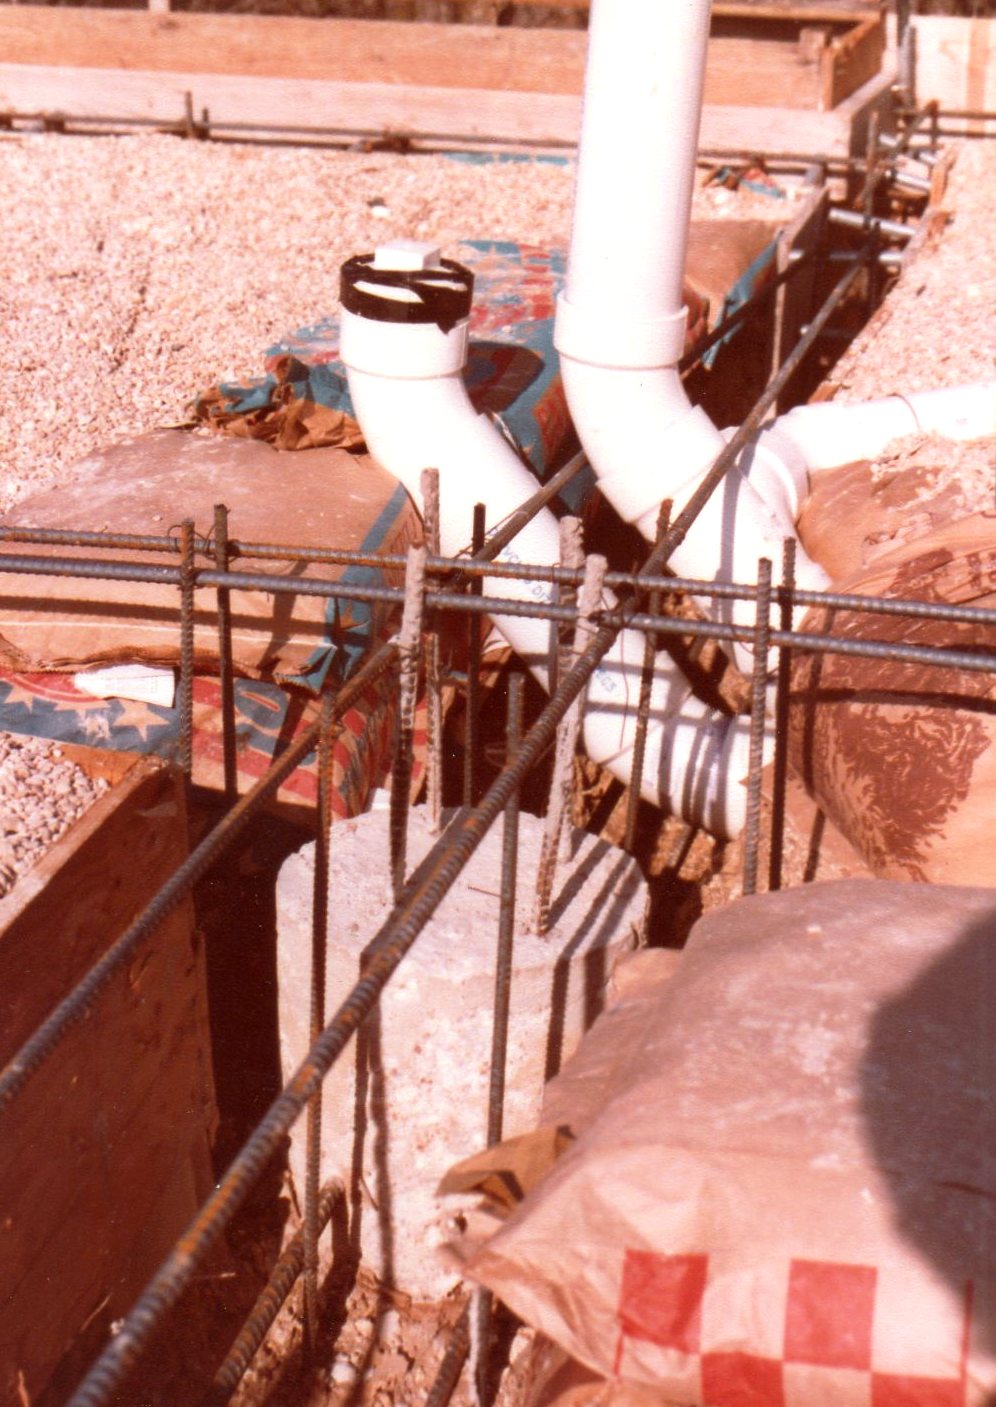
Wooden boxes cover plumbing pipes – these will form voids in the concrete so that I can connect the bathtub and toilet drains at a later date.
Early January: After Billy's help digging out that back footing, we made the final push and completed the forms around the foundation.

Below, Jan. 15, 1981:  One day before the concrete-pouring.
On a cold, clear Texas day, Dominic came out and helped me put the final touches on the project to get it ready for concrete.  For a living room that would be slightly sunken, we formed a 7" step-down all the way across the foundation.
Next, we installed a polyethelene vapor barrier over the dirt to keep moisture from coming up into the house. After that, we affixed steel re-mesh over everything.  (At top-left is the board that forms a step-down into the living room.)

Final prep: We added a couple of leveling boards down the center of the foundation so that we could screed the concrete with long boards.  The leveling boards would be removed once the concrete was fairly level. We were ready to pour concrete the next day.

BELOW:  Sneak preview

Billy works on 2nd-floor joists.  Ask him why I covered the lower left of this photo with a post-it note.

TO BE CONTINUED . . . . . . . . . . . . . . . . . . . . . . . .

Chapter 3:  Pouring the concrete

Saturday, April 2, 2011

CHAPTER 2 . . . . . . . . . . . . . . . . . . . . . . . . . . . . . . Oct. 1980 – Installing rudimentary utilities and beginning to shape the foundation

Before I could do much more, I needed to get water up to the house area. That meant digging an 80-foot trench, which took me six days, working a few hours each day after I got off work at Travis High School. There is a thing called digging, and another thing called "chopping through rocks."  This was the latter.

After paying Travis County "Water District 18" a small fee to install a meter at the street, I enlisted the help of my Dad to run a 3/4" copper tubing supply line through the trench, up the hill to the foundation area of the house.

Sweat expertise: Dominic joins sections of copper tubing, a process known as "sweating" that involves using solder and a blowtorch.  He had retired in 1979 after 20 years with the Federal Aviation Administration (preceded by 20 years in the Air Force). In retirement, he had considered building a new house near Barton Creek, but then changed his mind. He was always happy to come out and give me help and advice, and I think working on this project satisfied in him a same need that it satisfied in me.

In the early 2000s: A few years before he died in 2004, my Dad had been fretting that his current house in Cibolo, Texas, had a cheap PVC water supply line from the street. I think he had discovered that fact in the process of investigating a leak. During an Easter visit from California, I offered to dig up the pipe and replace it with copper. My Mom thought we were absolutely crazy to dig up the front yard, but Daddy was quite pleased with the new copper – I think it was the Italian influence. At any rate, it was a very small gesture on my part to help pay him back for some of the help he gave me in the 1980s on my house project.

While working on the water line, we turned over a rock and encountered this 3" tarantula. Texas tarantula's are the warm, fuzzy, lovable ones – not the deadly kind you find in Mexico.  At least that's what I was always told.


The critter next to Dominic's shoe.
The minute we got the copper supply line connected, we began to use the water. Above and below:  My mom Lee fills the trench with water to help settle the dirt as I shovel it back in. I'm not sure what the half-life of a Doritos bag is, but the one we threw in there probably is still there.


Above:  A view of the street-side water meter (foreground) that we tapped for the future-home's water supply. Below: The other end of the pipe, up in the slab area.  We attached a faucet and a hose, and immediately began enjoying the luxury of running water.
 

BELOW, Utilities, Part 2: Before I could get Austin Power & Light (now "Austin Energy") to connect electrical power to the lot, I had to have something to connect it to. I leafed through the Greensheet advertiser and found a used electric-meter loop rig for $40 (below). The city required that I purchase a GFCI outlet/breaker, which cost upwards of $40 back in those days. (Now, they are less than $10.)  But most things are more expensive today. For example, my 1980 building permit from Travis County cost $5, whereas my 2011 permits for my Tea Room addition in Lake Forest, CA, cost almost $800.  Once I had juice, some serious construction could begin.


Below: A sunset view through our oak trees.


By October 1980, it was time to focus on the structural design of the slab, which would require concrete beams under the home's load-bearing walls. This was particularly important because of all the unsettled fill dirt. I consulted with several friends and family members, most importantly my engineer brother-in-law Jimmy, who gave me invaluable suggestions through the course of this project.

The first step was to build 4 concrete piers that would rest on the undisturbed limestone beneath the fill dirt. Again, I hired my local excavator, Bert Teague, this time paying him $137.50 to dig four large holes with his backhoe, plus do some other shaping of the dirt mound and driveway.

In the process, Mr. Teague accidentally snagged some of my freshly buried drain pipes (below).


With the new power-pole (background), I could run a cement mixer to build the concrete piers. I ordered a load of rebar and steel mesh, and began assembling a pile of lumber – much of it used. One day I  borrowed my Uncle Oz's pickup and purchased a load of scrap shiplap board, complete with rusty nails, from the demolotion site of the old Perry Rose Firestone building in downtown Austin.  These would be used in building forms.

Below: A sequence of photos showing construction of the interior piers. Most of this work was done over the Thanksgiving 1980 holiday period.
The upper parts of the piers are formed using cardboard "Sonotubes," suspended using support lumber. They essentially are hanging – so that the concrete can flow through the tubes down into a square, reinforced footing.

Top of a concrete-filled Sonotube. The ceremonial concrete-mixing was conducted by my Dad, my youngest brother, Paul, and myself.

Cut-away view of foundation pier.
A few days after the concrete began to cure, my Dad tested the strength by smashing Pabst Blue Ribbon beer bottles against the footings.
A perfectly formed pier!


The top of a pier, now surrounded by fill dirt. The concrete cross-beams, which will be poured as an integral part of the slab, will be partially supported by these piers.

SNEAK PREVIEW: Below, in the mid-summer of 1981, Billy Yemma nailing plywood sheathing onto the steep, 16/12 pitch roof.


TO BE CONTINUED . . . . . . . . . . . . . . . . . . . . . . . . .

Chapter 3:  Christmas season 1980, final push to prepare the foundation forms.